
Rapid and flexible CAD/BIM documentation using MindManager Map Parts
Isn't it a small world? Today I was documenting project process and made MindManager Map Parts to make it faster. I thought this might be a good topic for a blog post. I have written about Map Parts b...

Isn't it a small world? Today I was documenting project process and made MindManager Map Parts to make it faster. I thought this might be a good topic for a blog post. I have written about Map Parts before, for documenting folder structures, but todays use was for various application UI elements.
Then the small world factor kicked in and saved me a whole lot of writing. I got home and on checking the days RSS feed activity found, thousands of kilometres and several time zones away, Michael Deutch (Mindjet’s Chief Evangelist) had been posting about Map Parts on the Mindjet Blog. That means I can concentrate on how & why I apply Map Parts, and another MindManager feature, then refer you to Michael's post for how to create, store & use them in a map.
Why use Map Parts for Process Documentation?

Repeatedly generating User Interface terms like "Project Browser", "Application Button", "Quick Access Toolbar" gets a bit tiresome, even using ActiveWords,
Creating map parts for these means adding topics just takes a click and also allowed me to build in some "MindManager smarts" to cope with a documentation challenge. Due to some of our projects being done with Revit toolbar based 2009 and ribboned 2010 (different consultants) I wanted to show both common & version specific task details for process.
The Text Map Markers in MindManager can be used to filter topics for viewing allowing one map to store & display multiple version documentation. My map parts have the correct markers applied where an element only occurs in one application version.
While this example is for versions of a single application you can use the same technique where a similar process is needed in different applications. It could be a task in Revit Architecture, MEP and Structure, perhaps Office Suite applications or different Web Browsers where the steps are similar but detail varies requiring different documentation.
Setting up Map Parts with Text Map Markers:
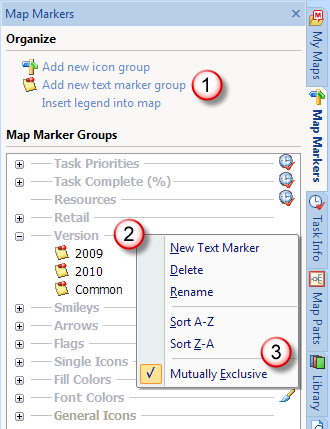
Before generating my Map Parts I created a Text Marker Group (1) called "Version" (2) with Text Markers for Common, 2009, 2010 and the Right Click > Mutually Exclusive (3) option ticked.This prevents you applying more than one Text Marker within a group to a topic. I applied these markers to the Map Parts and tested filtering, use, before adding them to the library (more on that later).
Structure your Map for Process, Task then Version Detail:
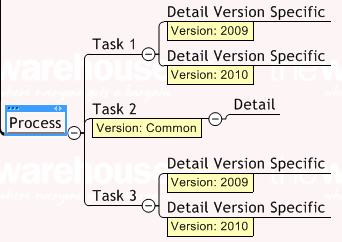
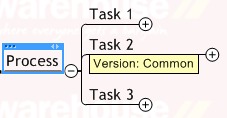
I structure the map so the process common to all versions are marked common. Where detail varies between versions there are duplicate topics with the appropriate marker applied. One advantage of this is if you just need a reminder of the steps required, without version detail, the collapsed Task topics can be used as an outline.
This example shows two common steps, one for Menu & Ribbon versions of the Export Command:

Application Specific views using Power Filter:
Using MindManager's Power Filter it's easy to show version specific views or create a Query (a saved filter configuration) for instant recall. Below you see the Power Filter configuration for Common + 2009 tasks and the effects of filtering the map for all, 2009 and 2010 markers.


A Power Filter configuration can be saved as a query for easy access from the Filter fly-out.

Using Map Parts with Text Markers:
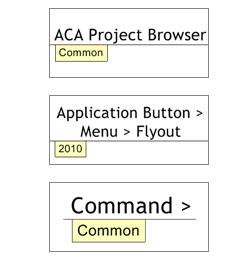
When you add it to the Map Part Library the Map Part stores the Text Marker, but not the Text Marker Group. In the example maps above you see the Parts with Group:Marker:Marker Version:Common, Version:2009, Version:2010 etc. When added to the library only the Common, 2009, 2010 marker is stored. At first I thought this was a bit stupid but it's actually more flexible.
If you add the part to a target map and it's Text Marker is already defined it will adopt the host group. If the marker is not defined it will be created in a MindManager generated group called "General Text Markers". This is a special group which does not display so only the Text Marker is seen (below).
If you drag a Text Marker from "General Text Markers" to a user created group in the Map Marker pane (below shows "Common" dragged to "Group Name") all existing markers will update to display the Group. It means you could use the same part for groups called year, application or whatever is appropriate for that map.

How to create and use Map Parts:
It's now I can just say, go & read this post on the Mindjet Blog*:
The Mindjet Blog » Build Better Maps Faster with Map Parts
The Mindjet Blog » Build Better Maps Faster with Map Parts
Here’s a time-saving feature in both MindManager for Windows and Mac that will help you build better maps with less time and effort.
It’s a feature called Map Parts. Today, I’ll show you how to use it with MindManager 8 for Windows. Tomorrow, I’ll explore the same with MindManager 7 for Mac.
Here’s a time-saving feature in both MindManager for Windows and Mac that will help you build better maps with less time and effort.
It’s a feature called Map Parts. Today, I’ll show you how to use it with MindManager 8 for Windows. Tomorrow, I’ll explore the same with MindManager 7 for Mac.
* Thanks Michael